Oops – if you were trying to read our article on challenges click here: https://starkcrew.com/starktips-challenges-our-clients-face/ we put in the wrong link into our newsletter!
Welcome to our first edition of #StarkTips, a monthly series where you’ll get insights from Stark Crew about the ins and outs of all the processes that are part of making a video. As the saying goes, knowledge is power, and we want to give you the information you need to know about how your video partners here at Stark Crew work, just to keep everyone as happy as possible. The first topic we have on the docket: taking the pain out of post-production.
Making video is so much more than taking a camera and shooting the footage. With any video, from a micro-documentary and other clips made by Stark Crew to Hollywood blockbusters with budgets that are close to the hundreds of millions of dollars, there are lots of little details and moving parts. On the projects we work on, we have multiple stakeholders that are often spread out across the world, which certainly adds some complexity to the process. But that doesn’t mean it has to be painful! That’s why we’ve got our post-production guru, Ainhoa Andraka, to give you the scoop on what you need to know about post-production.
Meet Ainhoa
Ainhoa Andraka is an essential part of our Stark Crew team. As a video editor and global video producer with experience in all forms of audiovisual communication, she’s our resident post-production expert. Here’s her wisdom about ways to make the process as painless as possible:
The Video Production Process: Go Step-By-Step
To both save time and money, clients should have the clearest idea possible of what they want. These means being as accurate as possible to communicate expectations to the video editor. Sometimes clients are overwhelmed by the big-picture final product, but when making a video, this isn’t the time you should be thinking big picture. Remember to go step by step. The more time you dedicate to every phase of the process, the better your video will be and the more money you’ll save.
And if you don’t know what you want, communicate that to the editor, and they will work with you to clear that up BEFORE starting to edit your video. The goal? Again, know what you want from the beginning – it is very time consuming and a huge cash pit to change things later on. The video production process has distinct phases that have an order we should always follow.
The Video Production Process for Live-Action videos (videos that include recording of new footage and are not editing-only)
- Script: where every idea begins. As the client and production team work to conceptualize the idea, this is time to decide all the text for the video. While it’s ideal to have the idea clear in your mind, the production experts are your friends. If there’s music you like or a video that’s similar to what you’re trying to achieve, SEND THE REFERENCES ALONG! We’re always willing to go over your ideas and see how we can integrate your requests.
- Storyboard: while storyboards aren’t always part of the production process, they’re extremely useful and recommended. You’ll be able to see illustrations which show what is going in at every moment of the video. It works to increase the clarity and avoid misunderstandings. If there’s footage that you’ve already shot, then a storyboard editing using screenshots from existing footage is an excellent idea to speed up the time to deliver and meet expectations correctly.
- Clip selection: this when you’re choosing clips from the already-shot raw footage. Someone has to go through all of that footage to select the best images that will end up in the final video. Usually, Stark Crew’s editors can choose “the best of the best” clips and present them to clients for final selection.
- Editing: this is the time where all the various finishing touch components take place. The formal definition of editing is that it’s the time when you manipulate and move the images you already have around to create a brand-new video. Many tasks are part of this stage. One is loading the already-shot material onto the computer (AKA – ingesting material). It takes MANY hours to transfer the files. It also depends on how you move it because VIDEO FILES ARE HEAVY. We sometimes transfer footage using FTPs, which are computer programs that make it more efficient to send these huge files. Sometimes people will even ship hard drives in the mail, but it’s preferable to use FTPs. Other components in this phase include the following:
- Voiceovers: The way we work with voiceovers at Stark Crew is to send clients sample recordings of our recommended voice actors – clients then choose the voice actors they want. Want to work even more efficiently with voice actors? If there are two or more possible versions for a particular voiceover, record them all in one session! Mainly, if you are unsure of your script, just go ahead and record multiple versions of it at the same time. What you want to avoid is sending a new version AFTER the actor has recorded the voice-over – because in that case, they will have to return to the studio and you´ll spend more for an additional day of the voice talent, as well as the studio.
- Sound correction: Sound correction may include improving the audio quality or making sure that the audio corresponds to what you see on the screen.
- Soundtrack: If you want a song in the background, this gets added in the post-production process. Let us know at the start if you are selecting songs or what us to select them for you. We also have our composer who can make original music for your video from scratch!
- Color correction: To make sure the colors come out the way you envision, then the place for it is in post-production. This is actually pretty major deal. Color correction can make a tremendous difference in your video´s quality – don´t forget it.
The Animation/Motion Graphic Production Process (Animation refers to when characters and narrative are used to express ideas while motion graphics relies on the type of text used, color, and space. If you want a more in-depth explanation, check out this article from Genuine).
- Script: This is the same process as in a live-action project.
- Design: Once you have the story, you need to decide what the world you want to portray looks like: the characters and scenery. When they were in the process of making Spongebob Squarepants, there were lots of details to decide: what Spongebob, Patrick, and all the other characters would look like, whether Spongebob would be yellow or some other color, and of course, what would be the aesthetic of Bikini Bottom. Not only is it about designing the characters and the scenery, but it’s also fundamental to choose the color palette because there are so many different shades of any color you can imagine (you have to make sure the colors that are most prominent in the video look good together).
- Storyboard: In animation and motion graphic projects, the storyboard is fundamental. You could say that it’s the technical screenplay for animation.
- Animatic: This is the animated storyboard. You’ve got to decide how the characters should move, and this is the phase in which you make those decisions.
- Voiceover: Voiceovers are fundamental for animated and motion graphic videos. They’re critical to transmitting the message you want in your video. The same wisdom about recording multiple versions in the same recording session applies for animated/motion graphic videos.
- Editing: And, of course, it’s important to modify EVERYTHING in every step of the animation/motion graphic process
And, now, the tips to take the pain out post-production
- Have everything as clear as possible in every phase of the process: Clients often come back with sudden changes after they’ve seen the final product many times. Making those changes so late into the process means that the timing will slow down because it will require more hours to make those changes. And the more hours spent making changes means that you’ll fall behind on your video production schedule. And, as we mentioned before, we who work in production are your friends. If you don’t have everything clear, you can ask us to help you out by sending us references and helping you work through your ideas. Here’s what you need to think about for a successful process: what you’re making the video for, where it will be used/distributed (because it will be different if you share it on social media or a big screen), and the markets you’re going to be showing the video. These details are all different, and the circumstances say a lot about how the process will go.
- Know how many videos you want: While we are aware that many TV commercials have different versions (the full spot at 1 minute and maybe smaller 20 or 30-second versions), this doesn’t mean that it’s as easy as making versions of the same file. In fact, each version is a separate video (and is charged as such). That means that you’ll want to know at the beginning of the process how many you want.
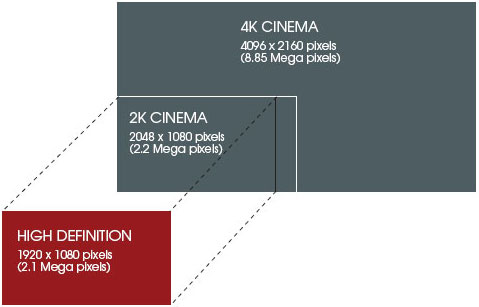
- Give more time than you think you need: Having enough time to get everything right is important. Depending on the demands of the video project, the timing will be different. And, the post-production process takes hours and hours. Let’s take the example of working with footage based on the image resolution:
-

Image source: https://1.bp.blogspot.com/-RQ8PCiR_ZeE/VynRyIdSoVI/AAAAAAAABcw/N81MbAlOFxwnJRd_nNcetWsAz6wMPksjwCLcB/s1600/4k-resolution-vs-1080p.jpg As you can see from this snazzy diagram, the size increases based on the image resolution. If we compare it in terms of time, it means that it will take twice as long to import 2K material than HD and four times longer for 4K files. And if you’re thinking Virtual Reality, you’ll need eight times the amount of time (especially when it’s a 360° virtual reality video). It takes a lot of time to compress these huge files and add all the little details in the video. The more time you give to the production team, the better the final product will come out.
- If you must ship a hard drive, always do it securely: While using FedEx, UPS, MRW, or any of these mail carrier services cost more, they are often trusted and used by companies. If you want to use regular mail services, you should ALWAYS send hard drives as certified mail. While you can do this, it’s preferable to use FTPs to transfer files. Plus, shipping hard drives takes longer. Always make a backup before sending footage anywhere! Stark Crew always makes a backup and will not delete it until the client’s footage is received and working properly.
- If you’re using a logo (or logos) in a video, we have three important rules of thumb: Logos seem simple as if they’re an afterthought. In reality, they can take hours and hours. Here are three rules of thumb when it comes to logos: send the latest version of the logo, send the most editable/highest resolution file, and when there’s more than one logo-send the logo hierarchy. We’ve often been told very late in the process that the logo in the video isn’t the latest. These changes result in hours going back into the file and changing it. In a video, we also want high-quality versions, and for us to make edits as easy as possible, editable files from PhotoShop or Adobe Illustrator (.ai files) are the ideal formats. If you must send PNG or JPG, always make sure it’s a high-quality PNG or JPG. The logo should shine brightly and be clear on screen. If there’s more than one logo, we need to know which logo goes first, second, third, etc. The hierarchy of logos, much like in a corporate structure, is necessary to transmit the message you want in the video.
- Have the whole team involved every step of the way: Often, one person will be the primary spokesperson between production and the client. And when it’s time for the whole team to see the video, we get quite a bit of feedback that we could have solved better at earlier stages. The whole team should be involved in the decisions before the final post-production phases. This way everyone’s on the same page from the get-go and the work is done more to everyone’s liking. And this is the first part of why working step-by-step is better: the more time everyone on the team dedicates in each step, the better the quality will be.
- Time and cost mean something: The time and money involved in creating a video are all about achieving the necessary quality. Many processes take a long time by nature, and given the cost of the necessary equipment, they are reflective of the effort put into every video.
- Be patient: The best way to think about this is to consider opportunity cost. In economics, this means that when you work on something, you sacrifice doing something else: you drink coffee instead of eating a donut. It sometimes takes longer for a rough version to be sent to calm a client down than it would keep making progress on the final product. Why, do you ask? Because it can take hours to shrink and send the file. And that leads us to our last tip
- Trust us: We want to make sure that your video comes out the best it can be. We’re always willing to consult you on anything that inspires you as you come up with ideas. And remember, there’s a reason why we work in different steps: the more time you dedicate to every phase of the process in order, the better your video will be and the more money you’ll save.